Babysaurus in the Kitchen: St. Nicholas Cookies

St. Nicholas Cookies - Looks Like Dinosaurs

Last weekend — what with it being December — I thought it was a good time to order Christmas cards, which meant we were in need of a new family photo. Because, let’s be honest, we have maybe one fairly good photo from the past year with all four of us in it. And there’s something about putting a beach photo on a Christmas card that just feels weird to me.

So we set about DIYing a family photo shoot and to make it as easy as possible (no posing), we decided on a lifestyle type shot while making cookies. For real, of course. And for a holiday family cookie-baking photo shoot, there’s no better cookie recipe than St. Nicholas cookies.

St. Nicholas Cookies - Looks Like Dinosaurs

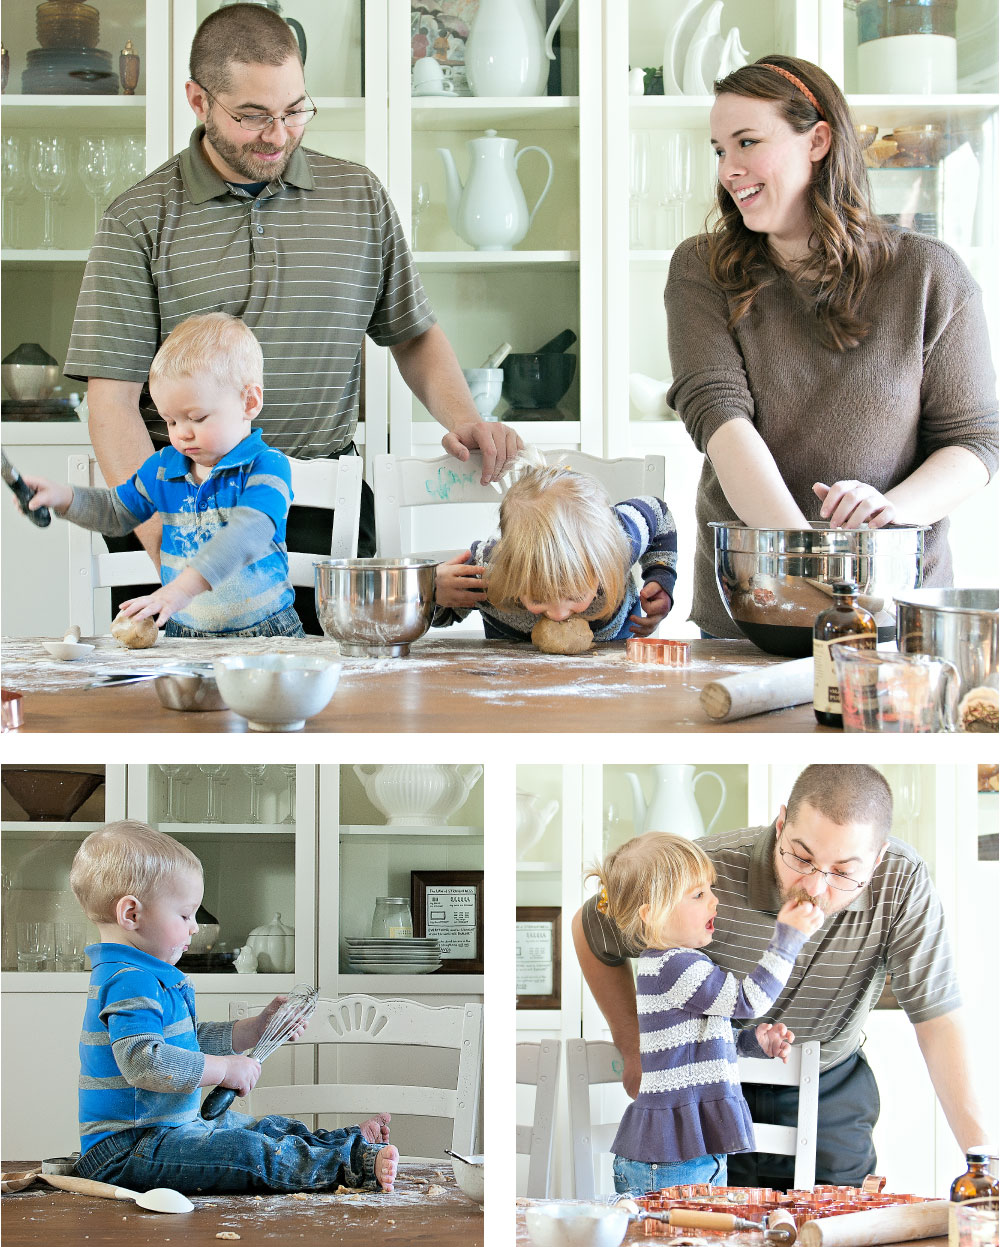
St. Nicholas cookies, as the name implies, was the Christmas cookie of choice when I was a kid and I still look forward to a plate of them from my mom at Christmastime. This vegan version — modified with dairy-free margarine and applesauce instead of egg — is just as good as the original. This cookie is neither buttery nor sugary, but spiced with cinnamon, nutmeg and cloves. I love them plain or simply adorned with sugar sprinkles. And they’re absolutely best when shared with somebody special over a morning coffee or sippy cup of warm milk.

St. Nicholas Cookies
(Makes approx. 36-48 (2-3″) cookies)

1 1/2 cups light brown sugar
1/2 cup granulated sugar
1 1/2 cups dairy-free margarine, softened
1/4 cup sugar-free applesauce
1/2 teaspoon vanilla extract
4 1/2 cups all-purpose flour
1 teaspoon baking powder
3/4 teaspoon salt
1 1/2 teaspoons cinnamon
1/2 teaspoon nutmeg
1/2 teaspoon cloves

1. Combine brown sugar, granulated sugar and margarine in the bowl of an electric mixer fitted with paddle attachment. Mix on low speed until sugars and margarine are combined and the mixture looks light and fluffy.

2. Add applesauce and vanilla extract to sugar mixture. Mix well.

3. In a separate medium bowl, whisk together flour, baking powder, salt, cinnamon, nutmeg and cloves.

4. Add flour mixture to sugar mixture one-third at a time, mixing on low after each addition until flour is well incorporated. Dough should be very soft.

5. Divide dough in half and form each half into balls. Lay out two sheets of plastic wrap and put one ball of dough on each. Pat out each ball until dough is about 1/2 inch thick. Wrap tightly with plastic, keeping dough in 1/2 inch thick sheets. Refrigerate for 30 minutes.

6. Preheat oven to 350 degrees.

7. Remove one of the dough halves from the refrigerator and unwrap. Place on a floured surface and roll dough 1/4 inch thick. Cut into shapes of choice and arrange on a parchment or silicone lined baking sheet, leaving at least 1/2 inch between cookies. Gather dough scraps into a ball, re-roll and cut. Repeat with other half of dough.

8. Bake cookies for 10-15 minutes. Immediately transfer cookies to cooling rack.

Ombre Sparkle Shoes

Ombre Glitter Shoes - Looks Like Dinosaurs

There was a time when the very idea of wearing glitter anywhere on my person would have turned my expression sour and induced exaggerated shudders. And even to this day, there is a very vocal part of me that warns me that if I invite glitter into my life, it will never leave. But then another part of me — tired of laying silent — goes, “But it’s so sparkly!

While I can’t explain what triggered the shift from no-holds-barred glitter rejection to totally expanded glitter consciousness, I can tell you that you should consider learning to ombre glitter because! It’s so sparkly!

It’s also an insanely easy, kind of messy, madly inexpensive way to breathe new life into a pair of shoes (or other object) that have seen better days or that you’ve fallen out of love with, but are still in your closet because you paid good money for them and, come on, they’re just so comfy.

Feeling nervous? That’s understandable. You paid good money, after all. My advice then is to pick a pair of shoes that you know you won’t miss, or that you keep telling yourself you should get rid of anyway. For me, it was a pair of black suede pointy flats that were comfy enough, but I knew I needed to get rid of them because they don’t fit my new capsule wardrobe criteria.

The benefit of this is you’ll have no reason to fear messing up: either you end up with an amazing “new” pair of shoes or you finally have a good enough reason to get rid of them. And when they turn out awesome, it’ll be like getting a fancy new pair of shoes for less than ten bucks.

Ombre Glitter Shoes - Looks Like Dinosaurs

You’ll need:

  • A pair of shoes, or some other mundane object that can be improved with sparkle. An old clutch, a notebook, some pine cones, your daughter’s toothbrush, your whisk collection. Just look around!
  • Glitter, three colors (same color in dark, medium, and light)
  • Glue (clear or white)
  • An old or inexpensive paintbrush
  • Covered work surface

Ready?! You can do this.

Ombre Glitter Shoes - Looks Like Dinosaurs

1. Do one shoe at a time. Using your paintbrush, apply a good, heavy (but not drippy) coat of glue on the outside of the shoe. Take care to avoid the sole but you can scrape it off later if necessary. That’s what I had to do!

2. Decide where you want your color to change. I chose the area right around the ball of the foot — the widest part of the shoe, which seemed like a natural transition point. Then generously sprinkle the darkest color all over the glued aread from the back of the shoe to the color change point. Lighten up on the sprinkling a bit past that point, so that there is still some glue visible where the next color can overlap and blend.

3. Sprinkle the middle color to the next color change point — about half of the area left after the first color. Like you did with the first color, sprinkle the middle color lightly just past the transition point. Also be sure to overlap with the first color so that the colors will blend and you won’t get a harsh line from one color to the next.

4. Repeat step 3 with the lightest color, overlapping with the middle color and covering the tip of the shoe. Gently tap the shoe to dust off the excess glitter. The best way I found was to stick one hand inside the shoe and hold it upside down while tapping the sole of the shoe with my other hand. Let the shoe dry while you glitter it’s mate.

Photo Nov 19, 10 32 56 AM

5. Let both shoes dry for at least an hour or two. You may need to apply a second coat of glue and glitter to get richer coverage and sparkle, though you will go much lighter on the glue and glitter the second time around. Touch up any “holes” as necessary.

6. Let the shoes dry overnight. Don’t put them on yet, tempting as it may be.

7. After the glue has dried thoroughly and the glitter has set — and make sure you wait, otherwise you may wind up removing or smudging your glitter when you try to brush over it — you can apply a coat of mod podge (or equal parts glue and water mixed) to seal in the glitter. Allow to dry for several hours or overnight.

FINAL NOTES: Anywhere you’ve accidentally glittered onto the sole or trim, you should be able to gently (carefully!) scrape away with a clean blade, such as a craft knife or razor blade. A dry paintbrush or paper towel can help you remove residual glitter from the inside of your shoes, although the pixie dust trail you leave after taking off your shoes might just work for you. A lint-free cloth soaked with a touch of olive/vegetable/baby/mineral oil can help you remove residual glitter from the rubbery sole (which glitter likes to cling to without glue). Or, again, maybe leaving sparkles in your wake is your thing. No judgment here.

Now, go get your sparkle on!

Ombre Glitter Shoes - Looks Like Dinosaurs

Babysaurus in the Kitchen :: Apple Cinnamon Crescent Rolls

LLD_applecinnamon_000

At our house, the best way to celebrate the rare mid-week work holiday is with a slow morning and a special breakfast treat.

Norah A. Babysaurus loves to “cook” and she never wastes an opportunity to push a chair up to the counter so she can stand next to me and help with whatever I’m trying to whip up, generally by swiping ingredients for her own concoctions, dancing on the counter, or putting all the cooking utensils in her mouth. And also telling me to stop whatever it is I’m doing because it’s all wrong. Today was no exception.

But unlike, say, a veggie stir fry, Apple Cinnamon Crescent Rolls are a perfect baking project for the two-year-olds among us. As long as you or someone you love do/does not have an irrational fear of opening pop-open biscuits, this recipe really doesn’t get much simpler. Or nummier.

LLD_applecinnamon_002


APPLE CINNAMON CRESCENT ROLLS

You’ll need:

1 can pop-open crescent rolls
1/4 cup butter or margarine, softened
1/4 cup light brown sugar
2 teaspoons cinnamon, or however much the toddler wishes to dump in
1/4 teaspoon ground cloves
1/2 large apple, sliced thin

You’ll do:

* denotes Little Kid-friendly steps

1. Preheat the oven according to the crescent roll package directions.

*2. Combine 1/4 cup softened butter or margarine, 1/4 cup light brown sugar, 2 teaspoons cinnamon, and 1/4 teaspoon ground cloves in a small bowl. Mix well.

3. Open the crescent roll package, or have someone you love do it for you while you dash out of the room plugging your ears with your fingers and also holding your breath for some inexplicable reason. Roll out the crescent roll dough on a clean surface and separate the triangles.

*4. Drop about 1/2 tablespoon worth of the butter mixture onto each triangle and spread evenly.

*5. Lay two or three slices of apple across the width of each triangle, about 1/2 inch from the wide end. Norah A. Babysaurus particularly enjoyed this step, and made sure to do it again and again and again.

*6. Eventually, you will be ready to roll up the dough. Beginning from the wide end, wrap the end of the dough over the apples and roll toward the narrow end.

*7. Place rolls on an ungreased cookie sheet, leaving a few inches of space between them so that they will get evenly crisp and golden and delicious.

8. Have the little one(s) stand far away from the oven while you open it to put the cookie sheet in. Bake according to package directions, until the crescent rolls are deeply golden.